# Layout parser Quickstart
Use layout parser to extract elements from a document, such as text, tables, and
lists.
*** ** * ** ***
To follow step-by-step guidance for this task directly in the
Google Cloud console, click **Guide me**:
[Guide me](https://console.cloud.google.com/ai/document-ai?tutorial=document-ai--documentai-workbench_layout_parser_console)
*** ** * ** ***
## Before you begin
## Create a processor
1. In the Google Cloud console, in the Document AI section, and select
**Processor Gallery**.
[Processor
Gallery](https://console.cloud.google.com/ai/document-ai/processor-library)
2. In the **Processor Gallery** ,
search for
**Layout parser** and select **Create**.
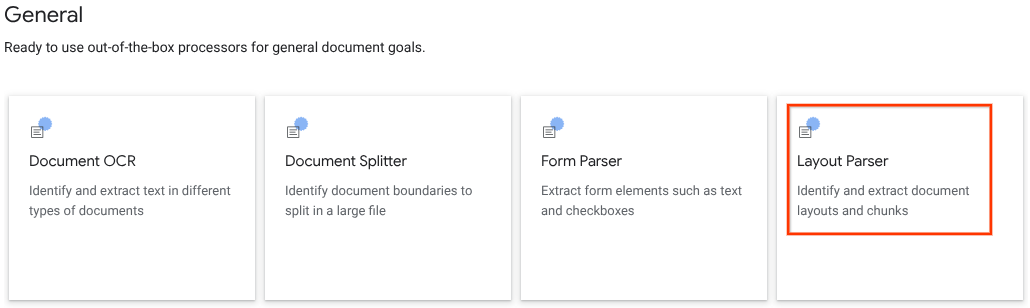
3. In the side window, enter a **Processor name** , such as `quickstart-layout-processor`.
4. Select the region closest to you.
5. Click **Create**.
You're taken to the **Processor Details** page of your new form parser processor.
6. Optional: Select a default processor by clicking **Manage versions**,
and selecting a processor from the **Versions** table. Then click
Mark as default
and confirm by entering the processor name.
## Test processor
After creating your processor, you can send annotation requests to it.
1. [Download the sample document](https://storage.googleapis.com/cloud-samples-data/documentai/codelabs/ocr/Winnie_the_Pooh_3_Pages.pdf).
2. Click the
**Upload Test Document**
button and select the document you just downloaded.
3. You should now be on the **layout parser analysis** page. You can view the
blocks or chunks parsed from the document, organized by detected types.
> [!NOTE]
> **Note:** The document view is only available for PDF file type.
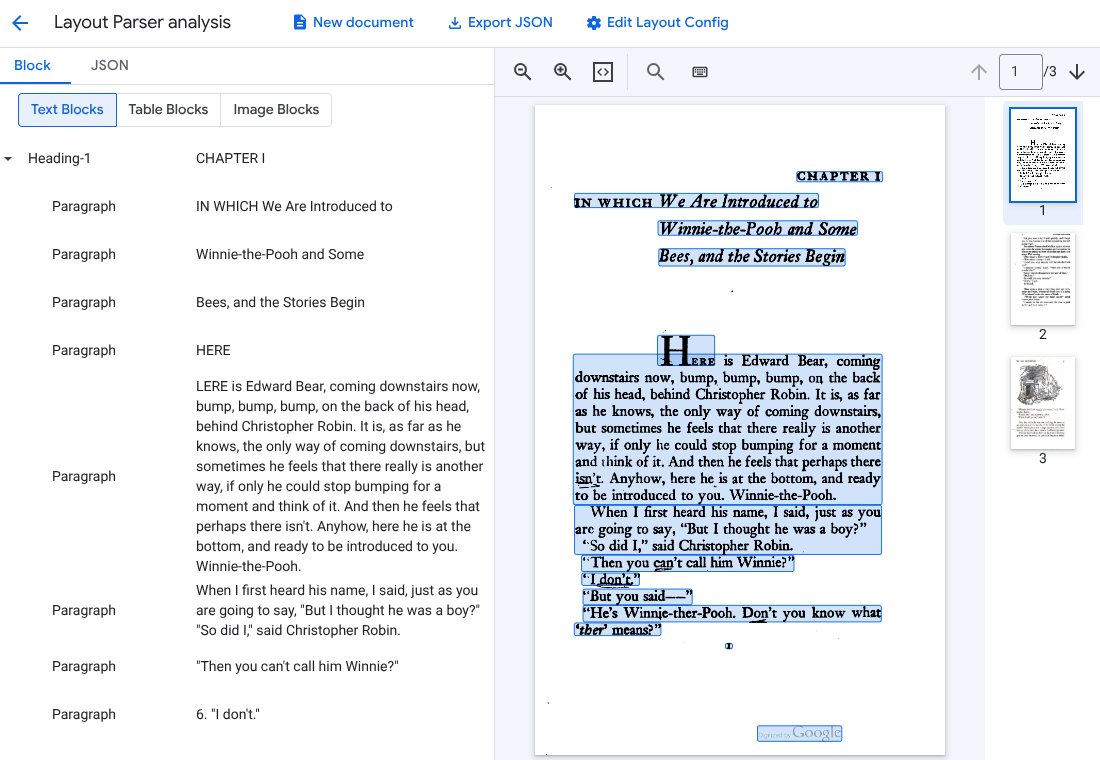
4. Optional: Select **Edit Layout Config** to enable image or table annotation data.
> [!NOTE]
> **Note:** There's bounding box support only for version `pretrained-layout-parser-v1.0-2024-06-03`.
## Process a document
### REST
This example shows how to send a document stored in Cloud Storage to the layout
parser for processing. This process enables image and table annotation by default.
### REST
Before using any of the request data,
make the following replacements:
- PROJECT_ID: Your Google Cloud project ID.
- LOCATION: your processor's [location](https://docs.cloud.google.com/document-ai/docs/regions), for example:
- `us` - United States
- `eu` - European Union
- PROCESSOR_ID: the ID of your custom processor.
- MIME_TYPE: Layout parser supports `application/pdf` and `text/html`.
- GCS_FILE_PATH: The file path for the Cloud Storage bucket with your document.
- CHUNK_SIZE: Optional. The chunk size, in tokens, to use when splitting documents.
- INCLUDE_ANCESTOR_HEADINGS: Optional. Boolean. Whether or not to include ancestor headings when splitting documents.
HTTP method and URL:
```
POST https://LOCATION-documentai.googleapis.com/v1beta3/projects/PROJECT_ID/locations/LOCATION/processors/PROCESSOR_ID/processorVersions/pretrained-layout-parser-v1.5-2025-08-25:process
```
Request JSON body:
```
{
"gcsDocument": {
"gcsUri": "GCS_FILE_PATH",
"mimeType": "MIME_TYPE"
},
"processOptions": {
"layoutConfig": {
"enableTableAnnotation": "true",
"enableImageAnnotation": "true",
"chunkingConfig": {
"chunkSize": "CHUNK_SIZE",
"includeAncestorHeadings": "INCLUDE_ANCESTOR_HEADINGS",
}
}
}
}
```
To send your request, choose one of these options:
#### curl
> [!NOTE]
> **Note:** The following command assumes that you have logged in to the `gcloud` CLI with your user account by running [`gcloud init`](https://docs.cloud.google.com/sdk/gcloud/reference/init) or [`gcloud auth login`](https://docs.cloud.google.com/sdk/gcloud/reference/auth/login) , or by using [Cloud Shell](https://docs.cloud.google.com/shell/docs), which automatically logs you into the `gcloud` CLI . You can check the currently active account by running [`gcloud auth list`](https://docs.cloud.google.com/sdk/gcloud/reference/auth/list).
Save the request body in a file named `request.json`,
and execute the following command:
```
curl -X POST \
-H "Authorization: Bearer $(gcloud auth print-access-token)" \
-H "Content-Type: application/json; charset=utf-8" \
-d @request.json \
"https://LOCATION-documentai.googleapis.com/v1beta3/projects/PROJECT_ID/locations/LOCATION/processors/PROCESSOR_ID/processorVersions/pretrained-layout-parser-v1.5-2025-08-25:process"
```
#### PowerShell
> [!NOTE]
> **Note:** The following command assumes that you have logged in to the `gcloud` CLI with your user account by running [`gcloud init`](https://docs.cloud.google.com/sdk/gcloud/reference/init) or [`gcloud auth login`](https://docs.cloud.google.com/sdk/gcloud/reference/auth/login) . You can check the currently active account by running [`gcloud auth list`](https://docs.cloud.google.com/sdk/gcloud/reference/auth/list).
Save the request body in a file named `request.json`,
and execute the following command:
```
$cred = gcloud auth print-access-token
$headers = @{ "Authorization" = "Bearer $cred" }
Invoke-WebRequest `
-Method POST `
-Headers $headers `
-ContentType: "application/json; charset=utf-8" `
-InFile request.json `
-Uri "https://LOCATION-documentai.googleapis.com/v1beta3/projects/PROJECT_ID/locations/LOCATION/processors/PROCESSOR_ID/processorVersions/pretrained-layout-parser-v1.5-2025-08-25:process" | Select-Object -Expand Content
```
You should receive a successful status code (2xx) and an empty response.
### Review the output
A successful request returns a document object in JSON. The most important fields
for Retrieval Augmented Generation (RAG) is `document.chunked_document.chunks`.
The following is the output form parsing the third page of "Winnie the Pooh" by
A.A. Milne.
{
"document": {
document_layout {
blocks {
block_id: "1"
text_block {
text: "WE ARE INTRODUCED 3"
type_: "header"
}
page_span {
page_start: 1
page_end: 1
}
}
blocks {
block_id: "2"
page_span {
page_start: 1
page_end: 1
}
image_block {
mime_type: "image/png"
annotations {
description: "This is an ink drawing depicting Winnie-the-Pooh sitting outside his house.\n\nHere are the facts and conclusions that can be derived from the image:\n\n* **Character:** The central figure is a bear, identifiable as Winnie-the-Pooh, sitting on a log.\n* **Location:** He is positioned outside what appears to be a small, rustic shelter or house.\n* **Signage:** Above the doorway of the shelter, there is a sign that reads \"MR SANDERZ\". Below this sign, there is another partial sign visible, where the letters \"RNIG\" and \"ALSO\" can be seen.\n* **Doorbell:** To the left of the doorway, a bell is hanging, indicating a doorbell mechanism.\n* **Setting:** The dwelling is surrounded by what looks like brush, trees, and general wilderness, suggested by the lines representing foliage and twigs.\n* **Log:** Pooh is seated on a cut log or tree trunk. To the left of this log, there are other smaller logs or branches piled up.\n* **Style:** The image is a black and white line drawing, characteristic of classic book illustrations."
}
blob_asset_id: "blob_1"
}
}
blocks {
block_id: "3"
text_block {
text: ""Winnie-the-Pooh wasn't quite sure," said Christopher Robin. "Now I am," said a growly voice. "Then I will go on,"said I.) One day when he was out walking, he came to an open place in the middle of the forest, and in the middle of this place was a large oak-tree, and, from the top of the tree, there came a loud buzzing-noise. Winnie-the-Pooh sat down at the foot of the tree,put his head between his paws and began to think."
type_: "paragraph"
}
page_span {
page_start: 1
page_end: 1
}
}
blocks {
block_id: "4"
text_block {
text: "Digitized by Google"
type_: "footer"
}
page_span {
page_start: 1
page_end: 1
}
}
}
chunked_document {
chunks {
chunk_id: "c1"
source_block_ids: "2"
source_block_ids: "3"
content: "__START_OF_ANNOTATION__This is an ink drawing depicting Winnie-the-Pooh sitting outside his house.\n\nHere are the facts and conclusions that can be derived from the image:\n\n* **Character:** The central figure is a bear, identifiable as Winnie-the-Pooh, sitting on a log.\n* **Location:** He is positioned outside what appears to be a small, rustic shelter or house.\n* **Signage:** Above the doorway of the shelter, there is a sign that reads \"MR SANDERZ\". Below this sign, there is another partial sign visible, where the letters \"RNIG\" and \"ALSO\" can be seen.\n* **Doorbell:** To the left of the doorway, a bell is hanging, indicating a doorbell mechanism.\n* **Setting:** The dwelling is surrounded by what looks like brush, trees, and general wilderness, suggested by the lines representing foliage and twigs.\n* **Log:** Pooh is seated on a cut log or tree trunk. To the left of this log, there are other smaller logs or branches piled up.\n* **Style:** The image is a black and white line drawing, characteristic of classic book illustrations.__END_OF_ANNOTATION__"Winnie-the-Pooh wasn't quite sure," said Christopher Robin. "Now I am," said a growly voice. "Then I will go on," said I.) One day when he was out walking, he came to an open place in the middle of the forest, and in the middle of this place was a large oak-tree, and, from the top of the tree, there came a loud buzzing-noise. Winnie-the-Pooh sat down at the foot of the tree,put his head between his paws and began to think."
page_span {
page_start: 1
page_end: 1
}
page_headers {
text: "WE ARE INTRODUCED 3"
page_span {
page_start: 1
page_end: 1
}
}
page_footers {
text: "Digitized by Google"
page_span {
page_start: 1
page_end: 1
}
}
chunk_fields {
image_chunk_field {
blob_asset_id: "blob_1"
annotations {
description: "This is an ink drawing depicting Winnie-the-Pooh sitting outside his house.\n\nHere are the facts and conclusions that can be derived from the image:\n\n* **Character:** The central figure is a bear, identifiable as Winnie-the-Pooh, sitting on a log.\n* **Location:** He is positioned outside what appears to be a small, rustic shelter or house.\n* **Signage:** Above the doorway of the shelter, there is a sign that reads \"MR SANDERZ\". Below this sign, there is another partial sign visible, where the letters \"RNIG\" and \"ALSO\" can be seen.\n* **Doorbell:** To the left of the doorway, a bell is hanging, indicating a doorbell mechanism.\n* **Setting:** The dwelling is surrounded by what looks like brush, trees, and general wilderness, suggested by the lines representing foliage and twigs.\n* **Log:** Pooh is seated on a cut log or tree trunk. To the left of this log, there are other smaller logs or branches piled up.\n* **Style:** The image is a black and white line drawing, characteristic of classic book illustrations."
}
}
}
}
}
blob_assets {
asset_id: "blob_1"
content: "image_bytes"
mime_type: "image/png"
}
}
### Python
This guide shows how to use the Python client library to process a document.
Using this code enables image and table annotation by default.
1. Install the client library.
! pip install --upgrade --quiet google-cloud-documentai
2. Run the processor.
def process_layout_parser(
project_id: str, location: str, processor_id: str, gcs_uri: str, mime_type: str
):
"""
Processes a document with the layout parser and prints chunk text.
"""
client = documentai.DocumentProcessorServiceClient()
# The full resource name of the processor
processor_version_id = 'pretrained-layout-parser-v1.5-2025-08-25'
name = client.processor_path(project_id, location, processor_id, processor_version_id)
# Configure the Cloud Storage document
gcs_document = documentai.GcsDocument(gcs_uri=gcs_uri, mime_type=mime_type)
# Configure processing options for RAG
# This enables annotation and context-aware chunking.
process_options = documentai.ProcessOptions(
# Process only specific pages
layout_config=documentai.ProcessOptions.LayoutConfig(
enable_table_annotation=True,
enable_image_annotation=True,
chunking_config=documentai.ProcessOptions.LayoutConfig.ChunkingConfig(
chunk_size=1024,
include_ancestor_headings=True,
),
),
)
# Build the request
request = documentai.ProcessRequest(
name=name,
gcs_document=gcs_document,
process_options=process_options,
)
# Process the document
result = client.process_document(request=request)
document = result.document
print(f"Document processing complete.\n")
print("--- RAG-Ready Chunks (with context) ---")
for i, chunk in enumerate(document.chunked_document.chunks):
print(f"\n--- Chunk {i} ---")
# Print the chunk's content
print(f"Text: {chunk.content}")
return result
## Batch process documents with layout parser
Use the following procedure to parse and chunk multiple documents in a single
request.
1. Input documents to layout parser to parse and chunk.
2. Follow the
instructions for batch processing requests in [Send a processing
request](https://docs.cloud.google.com/document-ai/docs/send-request#batch-process).
3. Configure fields in
[`ProcessOptions.layoutConfig`](https://docs.cloud.google.com/document-ai/docs/reference/rest/v1beta3/ProcessOptions#layoutconfig) when making a
`batchProcess` request.
### Input
The following example JSON configures `ProcessOptions.layoutConfig`.
"processOptions": {
"layoutConfig": {
"enableTableAnnotation": "true",
"enableImageAnnotation": "true",
"chunkingConfig": {
"chunkSize": "CHUNK_SIZE",
"includeAncestorHeadings": "INCLUDE_ANCESTOR_HEADINGS_BOOLEAN"
}
}
}
Replace the following:
- `CHUNK_SIZE`: The maximum chunk size, in number of tokens, to use when splitting documents.
- `INCLUDE_ANCESTOR_HEADINGS_BOOLEAN`: Whether to include ancestor headings when splitting documents. Ancestor headings are the parents of subheadings in the original document. They can provide a chunk with additional context about its position in the original document. Up to two levels of headings can be included with a chunk.
## Clean up
To avoid incurring charges to your Google Cloud account for
the resources used on this page, follow these steps.
To avoid unnecessary Google Cloud charges, use the
[Google Cloud console](https://console.cloud.google.com/) to delete your processor and project if you don't need
them.
If you created a new project to learn about Document AI and you no
longer need the project, \[delete the project\]\[delete-project\].
If you used an existing Google Cloud project, delete the resources you
created to avoid incurring charges to your account:
1. In the Google Cloud console navigation menu, select **Document AI** and
select **My Processors**.
2. Select **More actions**
in the same row as the processor you want to delete.
3. Select **Delete processor** , enter the processor name, then select **Delete**
again to confirm.
## What's next
For details, see [Guides](https://docs.cloud.google.com/document-ai/docs/how-to).